
This reference explains the DLTX color screen and every menu item, so you can dial in frequency, gain, microphone power, low cut, internal recording, timecode, RF power, and the system settings. Press the OK / MENU button to open the menu, use Up and Down to move and adjust, press OK to confirm, and press Back to step out.
Main Screen
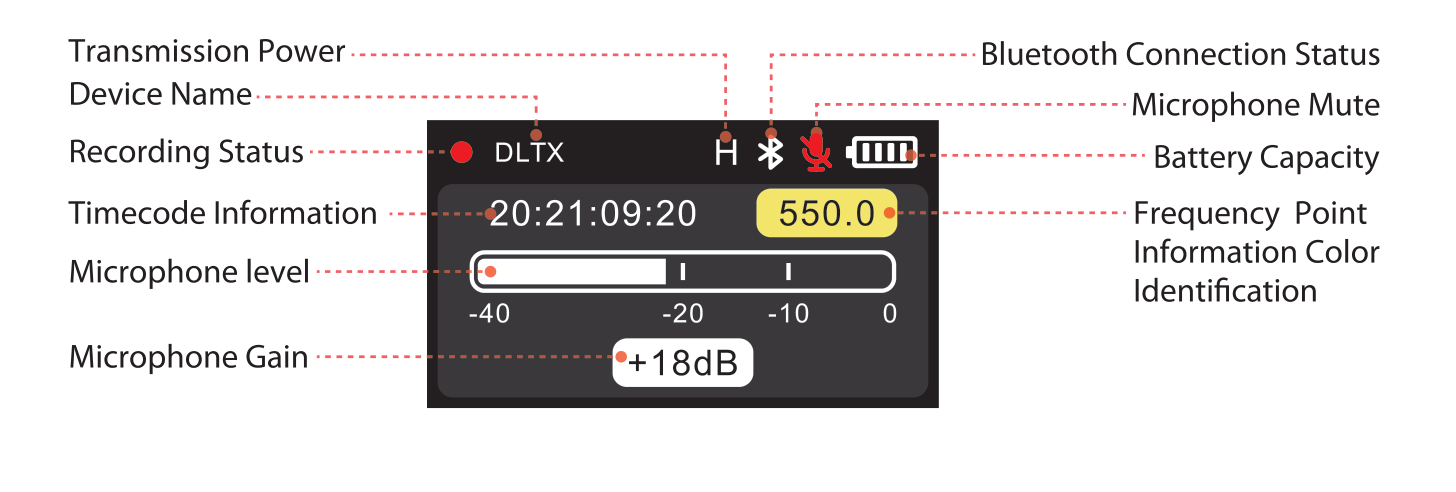
The main screen shows the transmitter's live status at a glance:
- Device Name and Recording Status at top left.
- Transmission Power, Bluetooth Connection Status, Microphone Mute, and Battery Capacity across the top.
- Timecode Information and the current Frequency Point (color coded) in the middle.
- Microphone level meter and current Microphone Gain below.
Recording
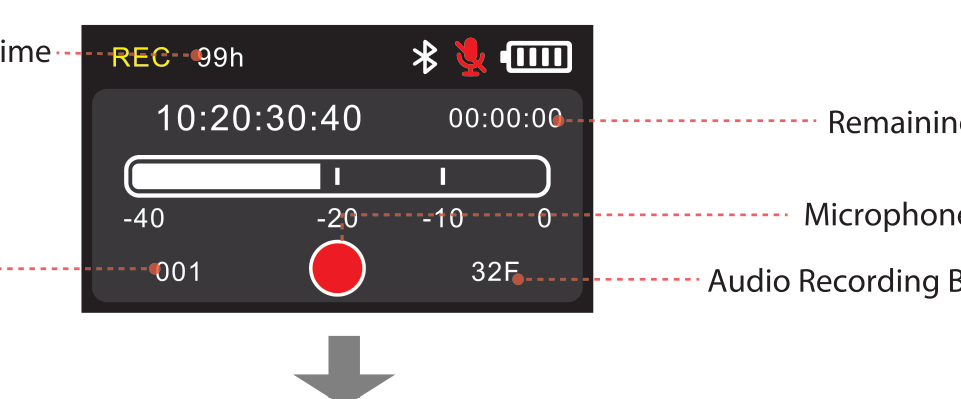
Long press the Up button to enter the recording interface. Press OK to start recording audio to the microSD card. While recording, press OK to bring up the confirmation prompt, then press OK (YES) to stop and save the file. The recording screen shows the remaining recording time, the elapsed time, the level meter, the recording file name, and the audio bit rate (for example, 32F for 32-bit float).
To learn more about the two record formats, see [DLTX] Using 32-Bit Float.
FREQ
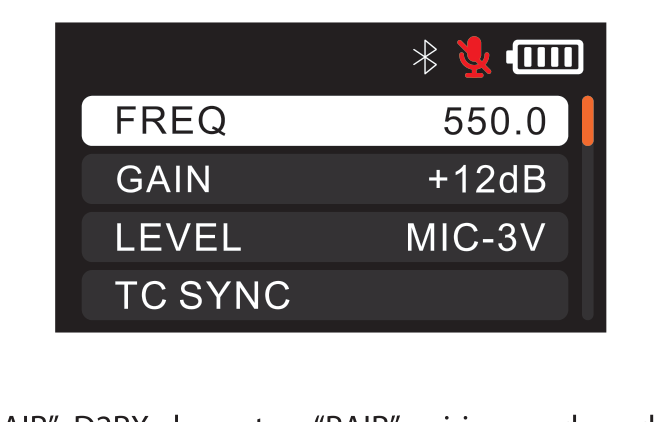
The FREQ item sets the transmitter's frequency point. It offers two options:
- PAIR: when the DLTX enters PAIR, put your D2RX receiver into PAIR as well and the two devices link automatically.
- MANUAL: set the frequency point by hand. The RF frequency step is 100kHz.
To let the receiver find the cleanest channels for you, run a scan on the receiver. See [THEOS] How to Scan & Pair.
GAIN
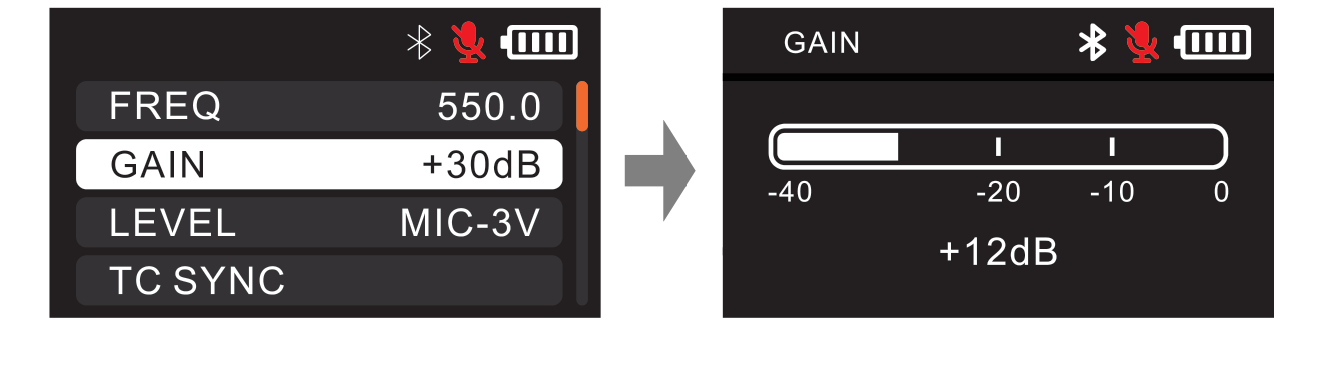
GAIN adjusts the microphone input gain, which can be increased by up to 30dB. Set the gain so your loudest expected audio peaks comfortably below 0dB on the level meter.
LEVEL (Microphone Power)
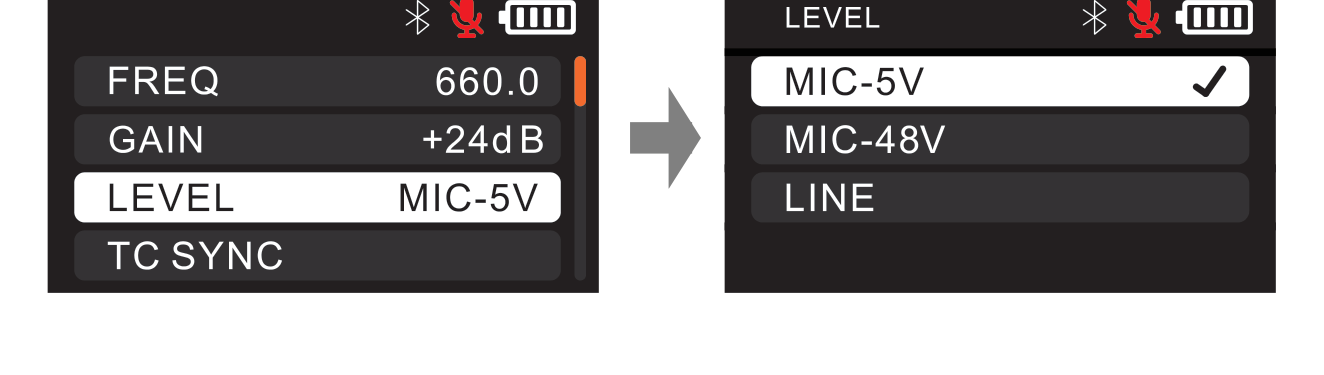
LEVEL switches the driving voltage supplied to the microphone. Choose the setting that matches your source:
- MIC-5V: bias power for most Deity and 3.5mm lavalier microphones.
- MIC-48V: phantom power for microphones that require it.
- LINE: line-level input from a mixer or another line source.
TC SYNC (Timecode)
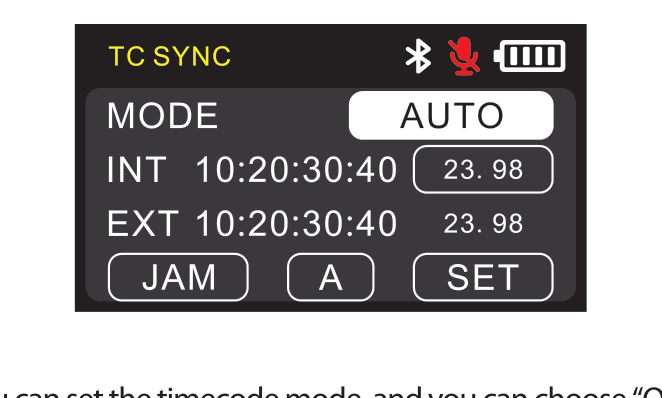
TC SYNC sets the timecode mode and frame rate. You can also reach it by long pressing the Down button. Under MODE, choose:
- OFF: timecode is off.
- AUTO: the default. Automatically recognizes wired or wireless timecode and synchronizes.
- ONCE: synchronizes once, then locks. It will not re-sync automatically; switching modes releases the lock.
- FREE: the device runs its own timecode. It does not restart timecode and does not accept external timecode signals.
Set the frame rate (FPS) as needed: 23.98, 24, 25, 29.97, 29.97DF, or 30. DF stands for drop frame. The system default is 25, so choose the right frame rate in advance. Use JAM to sync over the 3.5mm input, choose an A to H group so only devices in the same group sync, and use SET to enter a starting timecode manually. For the full walkthrough, see [DLTX] How to Set Up Timecode.
REC MODE
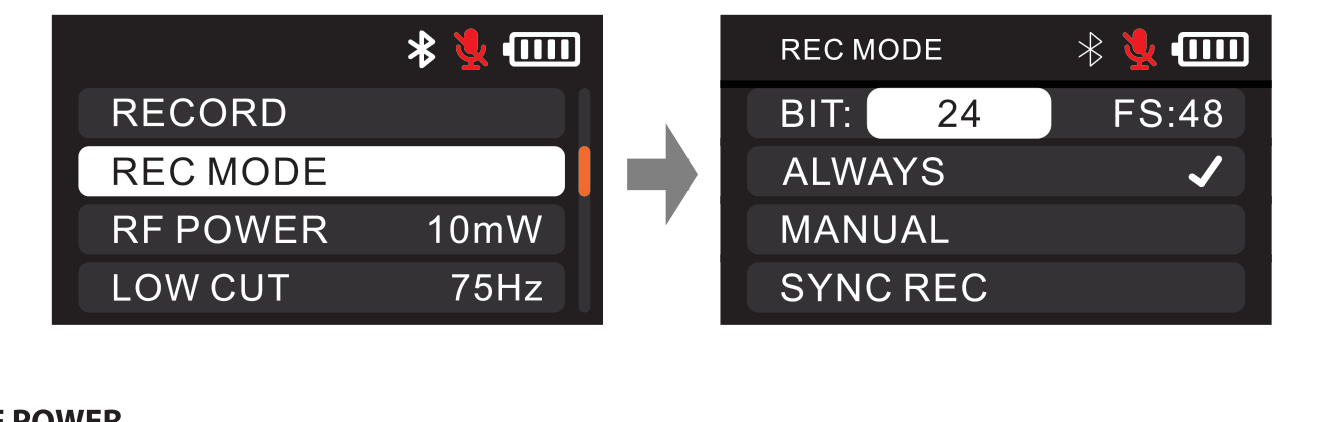
REC MODE sets the internal recording parameters. Choose the memory card bit depth: 24-bit or 32-bit float. You can also set the default recording behavior:
- ALWAYS: start recording automatically at power on, and stop and save the file automatically at power off.
- MANUAL: switch recording on and off by hand. This is the default.
- SYNC REC: start recording automatically after a manual start plus timecode sync. When SYNC REC is off, recording does not start automatically after a timecode sync. If the device is already recording when the timecode syncs, stop recording first, adjust, then re-sync; recording does not restart automatically after the sync.
Note: In the United States region, the RF function and the recording function cannot be used at the same time.
RF POWER
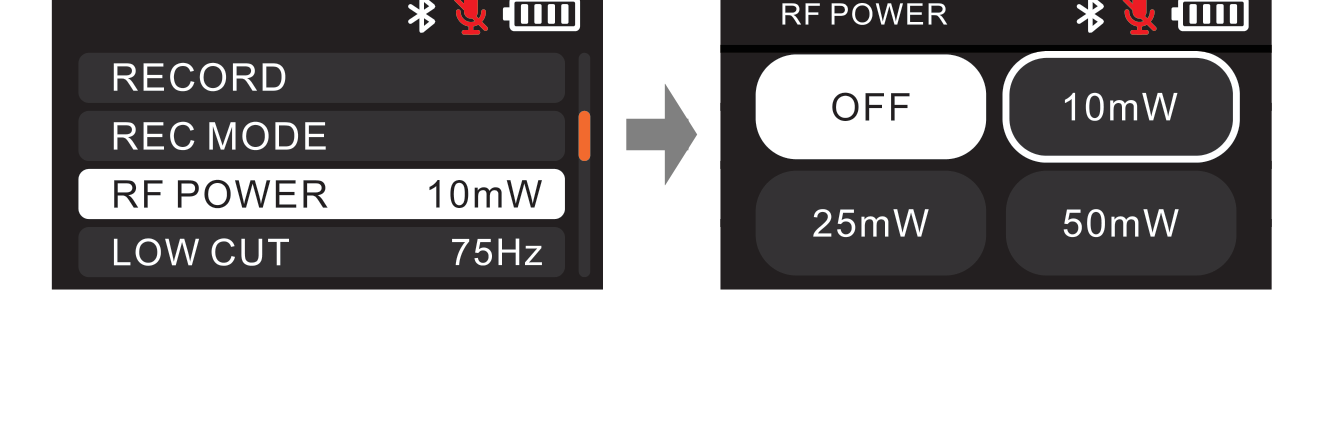
RF POWER sets the transmission power. Available options depend on your region: OFF, 10mW, 25mW, and 50mW (some regions also allow higher power). Choose the power allowed by your legal frequency band. Higher power extends range but uses more battery.
Note: In the United States region, the RF function and the recording function cannot be performed at the same time.
LOW CUT
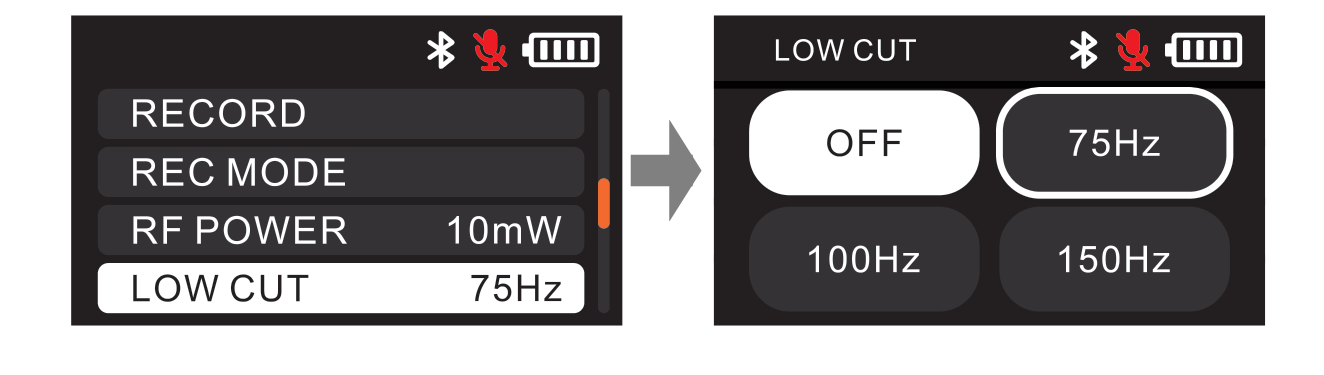
LOW CUT applies a high-pass filter to reduce low-frequency rumble, wind, and handling noise. Choose from OFF, 75Hz, 100Hz, or 150Hz.
DID (Device Name)
DID changes the name of the device. Use the Up and Down keys to select each character, press OK to save the selection, or press Back to restore the previous name.
FILE
FILE lets you view and play back the recorded material files on the memory card. Use the Up and Down keys to choose a file to play. Only files recorded on the current card can be viewed.
LED
LED turns the three status LEDs (REC, POWER, AUDIO) on or off to suit your needs, for example to stay discreet on set.
BT (Bluetooth)
BT turns Bluetooth on or off. Bluetooth is on by default. Select RESET and confirm YES to reset Bluetooth; a SUCCESS message means the reset is complete. The screen also shows the device MAC address, the unique factory identification code used to tell devices apart when connecting over Bluetooth.
BATTERY
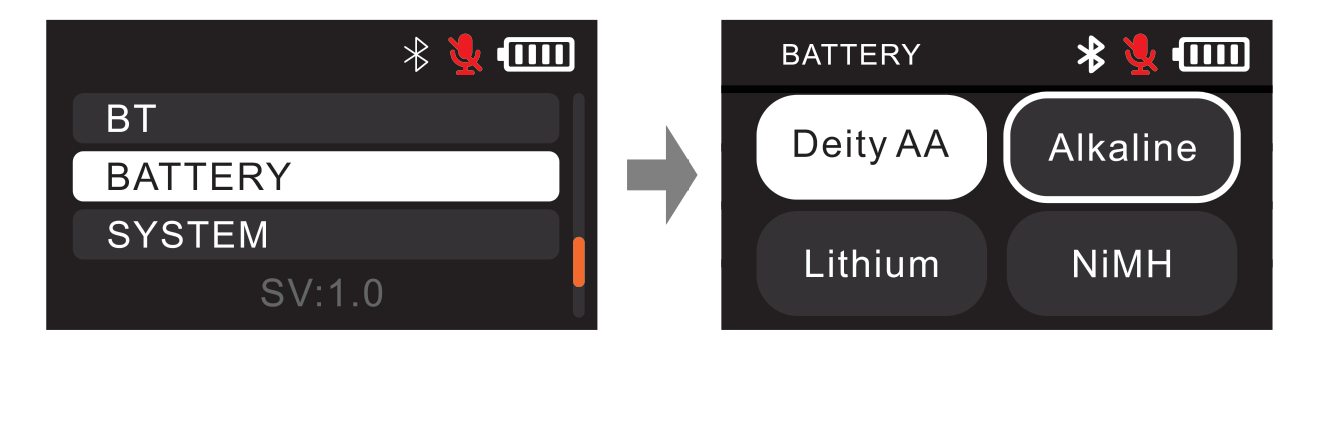
BATTERY sets the battery type so the transmitter can estimate remaining runtime more accurately. There are four options:
- DEITY AA: DEITY lithium iron battery.
- Alkaline: traditional alkaline battery.
- Lithium: 1.5V stabilized lithium battery.
- NiMH: 1.2V Ni-MH rechargeable battery.
SYSTEM
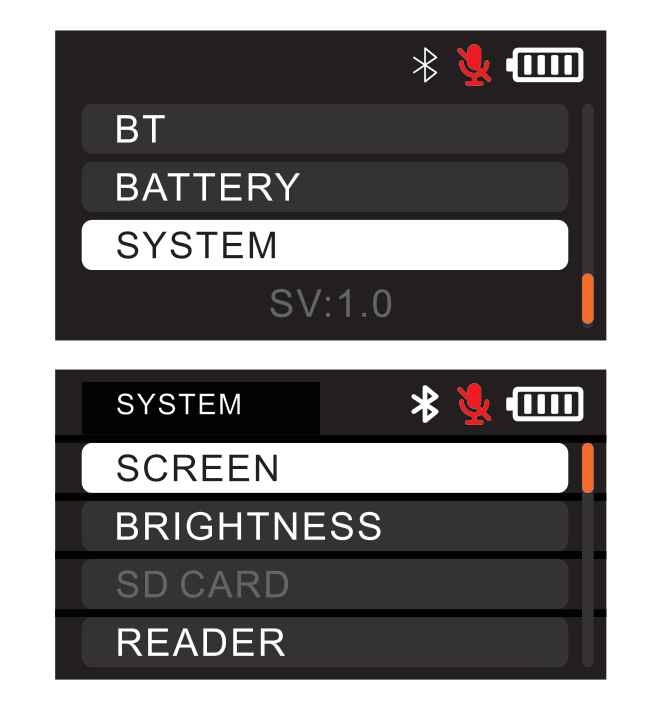
The SYSTEM menu holds the device-wide settings:
SCREEN
Sets how long the screen stays lit when idle. Options are Never, 15s, 1min, and 5min (default 15s). The device keeps your choice after the first use.
FLIP
Inverts the screen display, making the status and controls easy to read when the transmitter is used upside down (for example, mounted on a boom pole).
BRIGHTNESS
Sets the screen brightness across five levels. The default is the brightest, level 5. The device keeps your setting.
SD CARD
Shows the storage used on the memory card. Select FORMAT and confirm YES to format the card; a SUCCESS message means formatting is complete. Formatting the card in the device gives more stable recording. If no card is inserted, the screen shows NO CARD.
READER
Connect the DLTX to a computer with the data cable to transfer the recorded files. The screen shows a USB icon while in reader mode.
HOTKEY
Chooses which main-screen shortcuts are active:
- MUTE: short press the power key on the main interface to mute.
- REC/TC: long press the Up or Down key to jump to the recording or timecode interface. When off, these shortcuts are disabled.
- GAIN: quickly adjust the microphone gain level.
SYS RESET
Resets the device system settings. It only resets the system settings, not the frequency band data. Confirm YES to reset; a SUCCESS message confirms the reset.
FIRMWARE
Shows the current firmware version and the date it was updated.
UPGRADE
Updates the firmware from a USB DISK or the SD CARD, using an exFAT or FAT32 formatted drive. Put the latest firmware from the official website in the root directory of the drive or card. To use a USB stick, connect it to the USB-C port with the included USB-C to USB-A firmware update adapter. After the update completes, the device restarts and the firmware version shows the latest number. If no drive or card is inserted, or the upgrade file cannot be read, the screen shows NO DISK or NO CARD; check that the drive is inserted correctly and the file is in the right place.
DATE / TIME
Sets the device date and time. Press OK to enter each field, use Up and Down to adjust, and press OK to save (or Back to keep the previous value). Under DATE FORMAT you can choose DD/MM/YY, MM/DD/YY, or YY/MM/DD.
LANGUAGE
Sets the menu language for the device.