
The THEOS DIFB (Diversity IFB) is the wireless monitoring bodypack in the THEOS system. It uses two antennas for diversity reception, receives audio from a THEOS transmitter (such as the DBTX), and feeds it to a wired 3.5mm headphone or to Bluetooth headphones. This guide covers the global-version hardware, controls, and on-device menu. For the general concept and app-based setup of wireless IFB monitoring, see [THEOS] How to Set Up Wireless IFB.
What Comes in the Box
The DIFB ships two ways. Contents vary by region, and antenna length differs between regions.
DIFB (individually packed)
- DIFB diversity IFB bodypack (1 pc)
- SAM antenna (2 pcs)
- Antenna caps (red x2, yellow x2, blue x2)
- Belt clip (1 pc)
DIFB Kit
- DIFB diversity IFB bodypack (3 pcs)
- DBTX bodypack transmitter (1 pc)
- C12 coiled cable (1 pc)
- SAM antenna (7 pcs)
- Antenna caps (red x4, yellow x4, blue x4)
- Belt clip (4 pcs)
Get to Know Your DIFB
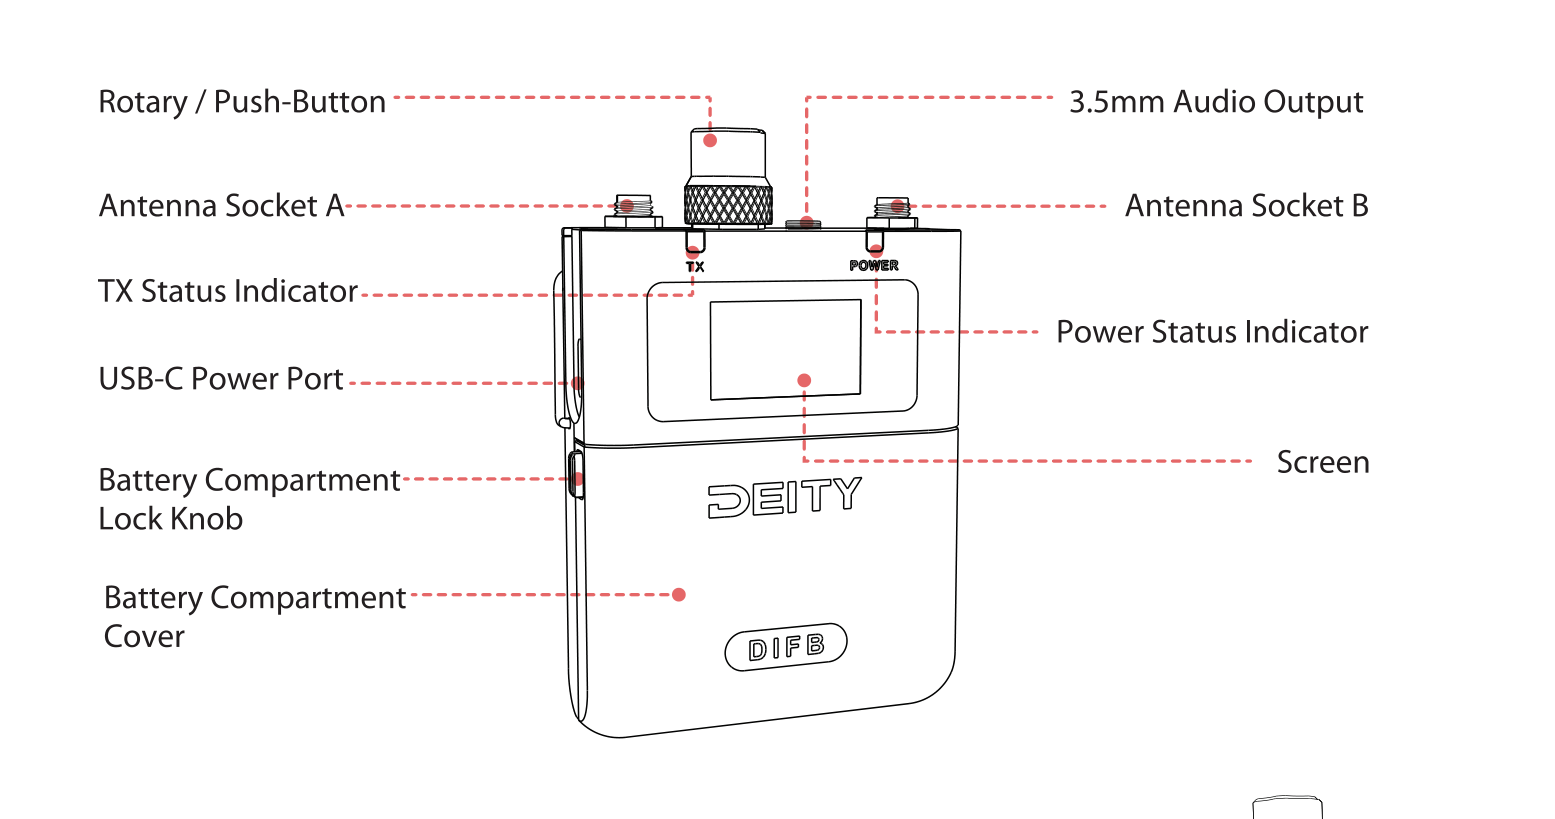
Key parts on the DIFB:
- Rotary / Push-Button (top center): volume and frequency-bank control.
- Antenna Socket A and Antenna Socket B: the two SMA antenna sockets used for diversity reception.
- 3.5mm Audio Output: wired headphone monitoring out.
- TX Status Indicator and Power Status Indicator: the two top LEDs.
- USB-C Power Port: external power and firmware upgrade.
- Screen, Battery Compartment Lock Knob, and Battery Compartment Cover.
Controls and Button Functions
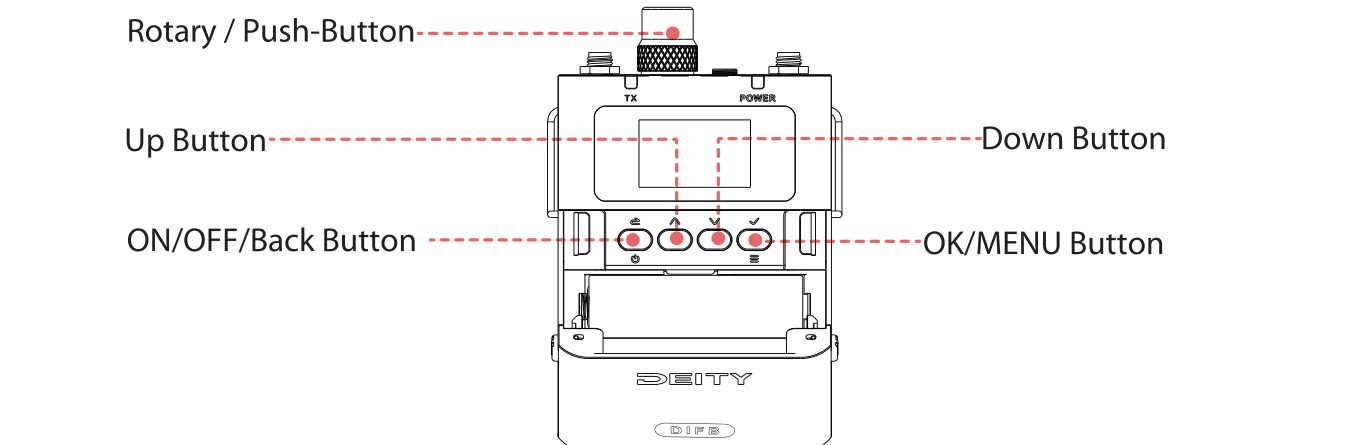
| Control | What it does |
|---|---|
| ON/OFF/Back Button | Long press to turn the DIFB on and off. Also acts as a back button while navigating menus, returning to the previous screen or menu item. |
| Up Button | Short press to adjust the selected menu item, switch the frequency within the frequency bank (when the main interface is focused on frequency), or increase the volume (when focused on volume). |
| Down Button | Short press to adjust the selected menu item, switch the frequency within the frequency bank (frequency focus), or decrease the volume (volume focus). |
| OK / MENU Button | Short press to enter the menu and confirm the selected item. |
| Rotary / Push-Button | Short press to toggle between volume and frequency-bank focus (the matching icon on the main interface highlights). Press three times in quick succession to lock or unlock the device (when locked, only volume can be adjusted). Rotate left to move down a frequency in the bank (frequency focus) or lower the volume (volume focus). Rotate right to switch the frequency bank (frequency focus) or raise the volume (volume focus). |
Antenna Installation
Thread each matching antenna onto an antenna socket on the top of the DIFB, then tighten to secure it. The DIFB antennas use a 50Ω SMA connector, and there are two sockets (A and B) for diversity reception.
Battery Installation
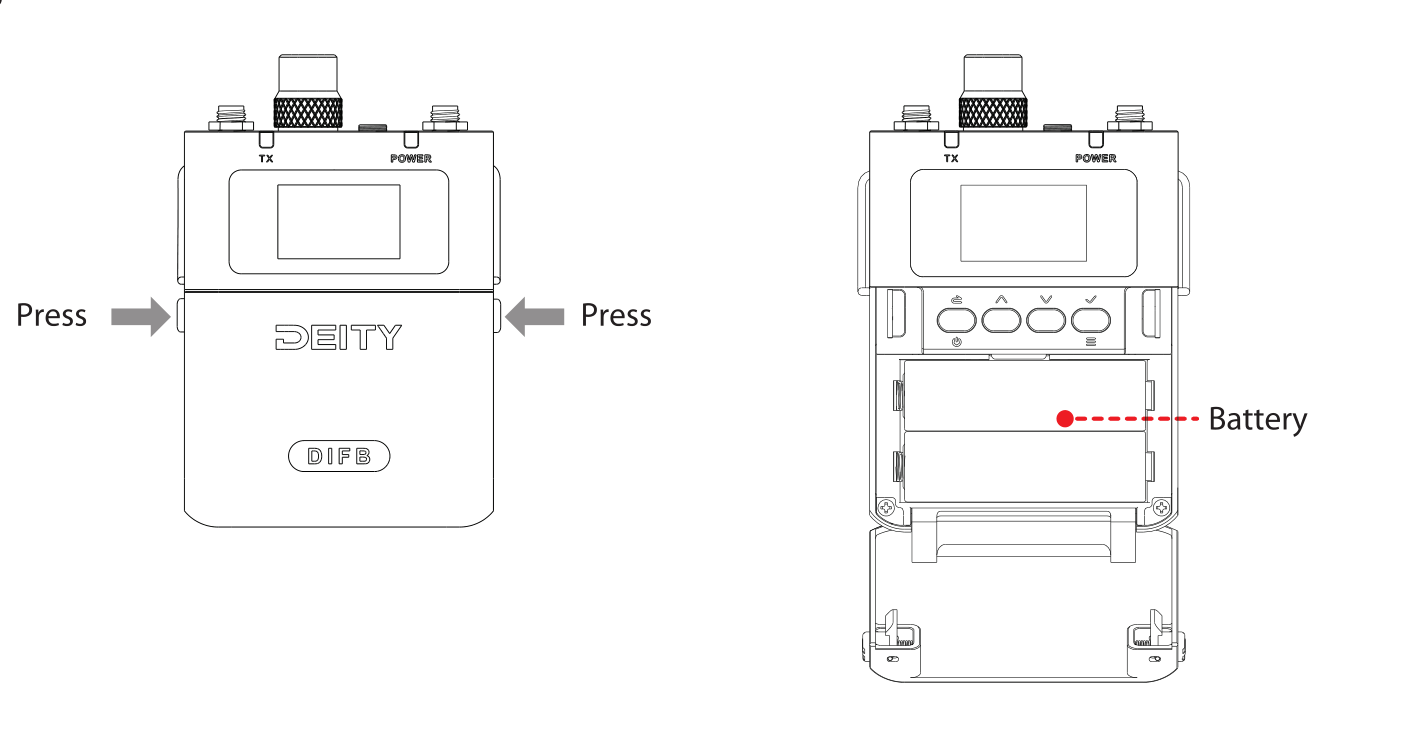
Press the battery compartment lock/unlock knobs on both sides of the DIFB at the same time, open the battery compartment cover, and install two AA batteries in the correct direction.
Installing the Belt Clip
Insert the steel wire belt clip into the installation holes on both sides of the DIFB, aligning it with the slots.
LED Indicators
- TX LED indicator: reflects the transmitter's volume level. From -40 dB to -10 dB the light is green. From -10 dB to 0 dB the light is red.
- Power LED indicator: glows green when the battery is good, and changes to red when the battery is low.
The top LEDs can be turned off under SYSTEM > LED if you prefer a dark unit on set.
Reading the Main Screen
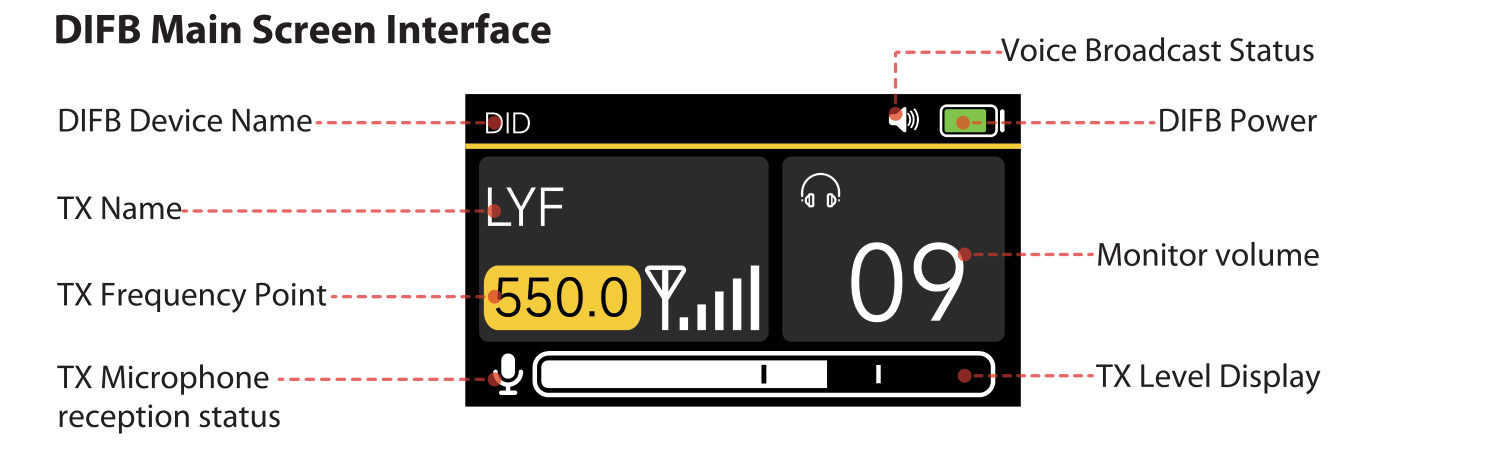
- DIFB Device Name and DIFB Power across the top, with Voice Broadcast Status.
- TX Name and TX Frequency Point: the transmitter you are monitoring and its frequency.
- TX Microphone reception status and TX Level Display: the incoming signal and its level.
- Monitor volume: your headphone listening level.
Press the Rotary / Push-Button to switch focus between volume and frequency, then rotate to adjust the highlighted value.
App Control and Activation (Global Version)
On the global version, the DIFB works with the Sidus Audio app for activation and control, and the correct legal frequency band is allocated for your region during first-time setup. Bluetooth app control (BT > CONNECT APP) is on by default. For the full first-power-on activation flow, see [THEOS] Getting Started - What's in the Box & Device Activation and [Sidus Audio] Introduction.
On-Device Menu Reference
Press the OK / MENU Button to open the menu, use Up and Down to move, OK to confirm, and the ON/OFF/Back Button to go back.
1. AUTO SCAN
Configure everything related to frequency scanning.
- SCAN CLEAN FREQ: scans the wireless environment and lists clean, low-interference frequencies ranked by star rating. Select a frequency from the list and set the matching frequency on your TX.
- SCAN TX: scans for all running TX devices in the environment. Detected devices are selected by default. Use Up/Down and OK to choose frequencies, then confirm at the end of the list to sync them to the Bank Lib File. Confirming clears the previous Bank Lib File data. If the screen says No device, check your TX status and scan again.
- SCAN HISTORY: view the TX frequencies from the last search that were not stored in the bank, and optionally add them to the Bank Lib File. This option is grayed out if no TX scan has run since power on or no devices were detected.
- RANGE: set the scanning frequency range. Options are 550.0-608.0, 608.0-630.0, 630.0-694.0, and 694.0-726.0.
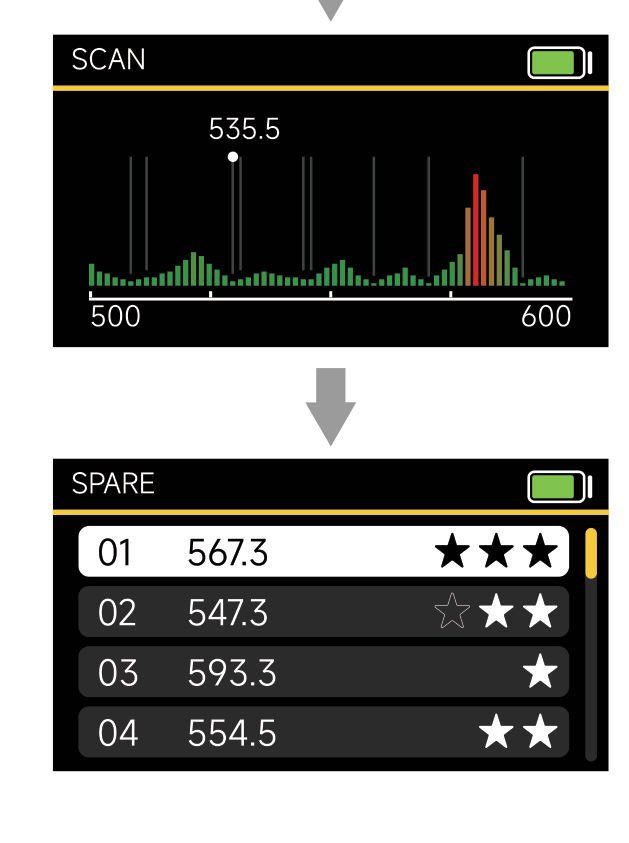
For a step-by-step walkthrough of scanning and pairing, see [THEOS] How to Scan & Pair.
2. BANK LIB FILE
View and manage archived frequency information, or clear what is currently saved. The bank stores up to 20 frequencies.
- EXIST FREQ: view and edit the stored frequency list. For a selected entry you can:
- SET NAME: rename the displayed TX device. Use Up/Down to pick characters and OK to save.
- EDIT SEQ: reorder the saved frequency points. Select an entry, choose EDIT SEQ, select the entry to swap it with, then press OK to complete the swap.
- EDIT FREQ: edit a frequency value. Long press Up or Down to adjust the value quickly.
- DELETE: remove the selected frequency (confirm YES or NO).
- CLEAN: clear all stored frequency information from the Bank Lib File (confirm YES or NO).
3. DID
Change the device name. Use Up/Down to select each character and OK to save, or Back to restore the previous name.
4. BT
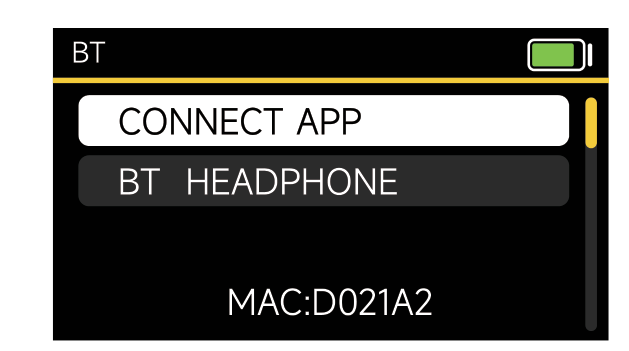
Turn the Bluetooth app function and the Bluetooth headphone monitoring function on or off, and manage headphone connections.
- CONNECT APP: when enabled, you can use the Sidus Audio app to connect and control the device. This is on by default. Select RESET and confirm YES to reset Bluetooth. The MAC address shown is the device's unique Bluetooth address, which distinguishes it from other devices when pairing.
- BT HEADPHONE: when enabled, you can connect Bluetooth headphones directly to the DIFB for monitoring. Enabling this automatically disables Connect APP and disconnects the DIFB from the mobile app.
- SEARCH LIST: for first-time pairing, search for available Bluetooth headphones, then select the target device to connect. If the headphone is not found, put it in pairing mode and search again.
- PAIRED DEVICES: lists previously paired headphones, with the currently connected one highlighted in yellow. Use Up/Down to select and reconnect a headphone, or choose Ignore to delete it from the pairing history.
5. ECO MODE
Turn ECO mode on or off (off by default). When ECO mode is on, the device reduces screen brightness and enters a low-power mode.
6. BATTERY
Choose the battery type in use so the DIFB can estimate remaining battery life more accurately (high-voltage batteries are not supported). Four options are available:
- DEITY AA: DEITY lithium iron battery.
- Alkaline: a traditional alkaline battery.
- Lithium: 1.5V stabilized lithium battery.
- NiMH: 1.2V Ni-MH rechargeable battery.
7. SYSTEM
| Setting | What it does |
|---|---|
| SCREEN | Sets how long the screen stays lit when idle. Options are Never, 15s, 1min, and 5min (default 15s). |
| BRIGHTNESS | Adjusts screen brightness across five levels (default 5, the brightest). |
| LED | Turns the top LED indicators on or off (default on). |
| ROTARY SWITCH | Defines the knob function. Volume limits the knob to volume only. All lets the knob control both volume and frequency switching. |
| TTS (Voice Reminder) | Turns the frequency-adjust voice broadcast on or off (on by default). |
| SYS RESET | Resets the device system settings only, not the frequency band data. Confirm YES to reset. |
| UPGRADE | Updates firmware by USB stick or the Sidus Audio app. Use an exFAT or FAT32 U-Disk with the latest firmware from the official website in the root directory, connected through a USB-C to USB-A adapter. If the file is not found, the screen shows NO DISK. |
| FIRMWARE | Views the current APP VERSION and HW VERSION along with their update dates. |
| LANGUAGE | Sets the interface language to Chinese or English. |