
Everything on the TC-SL1 is controlled from the rear OLED screen using the function control wheel. This reference walks through the display layout and every menu item, from locking the screen to firmware information. To learn how the wheel works, see [TC-SL1] Controls, Battery & Charging.
OLED Display Overview
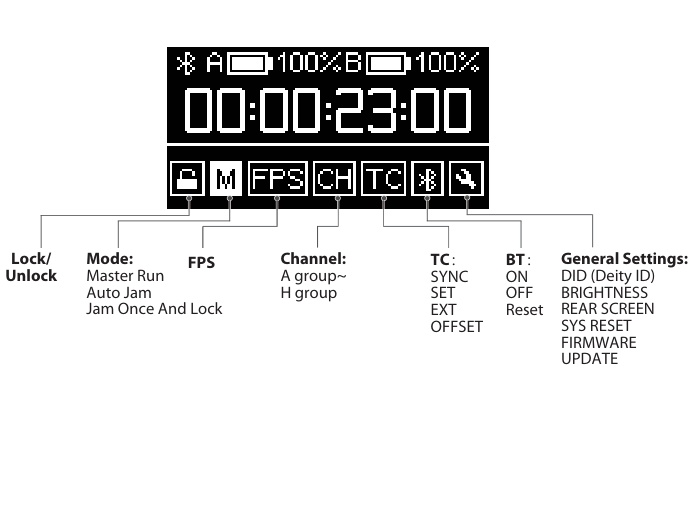
The rear OLED shows Bluetooth status, both battery levels (A and B), and the running timecode. The icon row along the bottom is the main menu. Rotate the wheel to highlight an icon and short-press to enter it:
| Icon | What it controls |
|---|---|
| Lock / Unlock | Locks the rear screen to prevent accidental changes. |
| Mode (M) | Master Run, Auto Jam, or Jam Once And Lock. |
| FPS | Timecode frame rate. |
| Channel (CH) | Wireless sync group, A group through H group. |
| TC | Timecode source and offset (Master Run only): SYNC, SET, EXT, OFFSET. |
| BT | Bluetooth on, off, or reset. |
| General Settings | DID, brightness, rear screen timeout, system reset, firmware. |
Lock / Unlock Setting
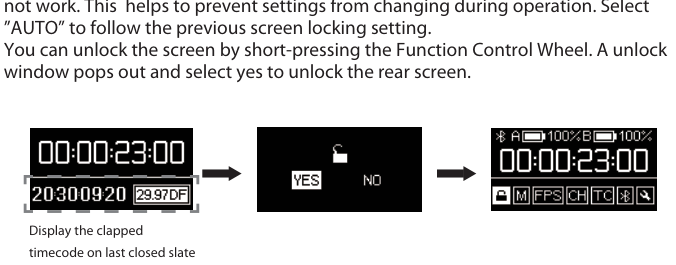
Enter the Lock / Unlock option in the main interface and select LOCK to lock the rear screen immediately. When the rear screen is locked, the buttons will not work, which prevents settings from changing during operation. Select AUTO to follow the previous screen locking setting. The locked display shows the clapped timecode from the last closed slate.
To unlock, short-press the function control wheel. An unlock window pops out; select YES to unlock the rear screen.
Mode (M)
Rotate the wheel to select a working mode, then short-press to confirm. There are three options.
Master Run
The TC-SL1 wirelessly outputs timecode to other TC-1 or TC-SL1 units on the same channel that are set to Auto Jam or Jam Once And Lock. It can also be jam-synced by cable over a 3.5mm connection. Deity recommends Deity timecode cables C13 or C14, or a spare 6.35mm TRS to 3.5mm TRS cable.
Auto Jam
The TC-SL1 waits to be jam-synced by an external timecode source.
Jam Once And Lock
The TC-SL1 locks after being synced once. The mode changes from Jam1 to JMD. In this mode the TC-SL1 will not follow any commands from a master TC-SL1. To change the mode, unlock it or control the TC-SL1 through the Sidus Audio app.
FPS
Select FPS to set the timecode frame rate. The options are 23.98, 24, 25, 29.97, 29.97DF, 30, and 30DF. DF stands for drop frame. The system default frame rate is 25. Set a suitable frame rate in advance so the TC-SL1 can feed each recording device with timecode.
Channel (CH)
If you do not have a mobile device on hand, you can synchronize TC-SL1 units with each other over wireless sync technology as long as they share the same channel setting. The channel options run from A group through H group. The system default channel is A group.
TC Setting
When the working mode is set to Master Run, the TC menu offers four options:
| Option | What it does |
|---|---|
| SYNC | Feeds timecode to other devices. |
| SET | Feeds timecode to other devices starting from 00:00:00:00 or any custom starting point. |
| EXT | Lets the TC-SL1 detect and be jam-synced by an external timecode source through the 5P timecode input jack. |
| OFFSET | Shifts the TC output up to plus or minus 10 frames in 0.1 increments (front display only). Use it to compensate for frame-processing delay against cameras and for TC offset to third-party gear. |
BT (Bluetooth)
Select the BT symbol to turn Bluetooth on or off. Bluetooth is on by default. To reset it, select RESET and then YES; the SUCCESS message confirms the reset is complete. Rotate the function control wheel to view the MAC address of your TC-SL1.
General Settings
The General Settings menu holds device and display options.
DID (Deity ID)
Enter DID to set a new device name by short-pressing the control wheel. A clear name helps you identify different TC-SL1 units in the Sidus Audio app monitoring screen.
BRIGHTNESS
Enter BRIGHTNESS to set the brightness of the red lattice screen and the backlight of the slate board sticker. Select UP to adjust the red lattice screen and DOWN to change the sticker backlight. DOWN has seven options (0, 1, 2, 3, 4, 5, 6) and UP has six options (1, 2, 3, 4, 5, 6). The default level is 3. After first use, the TC-SL1 boots with your last brightness setting.
REAR SCREEN
Enter REAR SCREEN to set the lock screen time. The options are Never, 15s, 30s, and 60s, with a default of 15s. After first use, the TC-SL1 boots with your last screen lock setting.
SYS RESET
Enter SYS RESET to reset the system and restore the default settings.
FIRMWARE
Enter FIRMWARE to see which firmware version your TC-SL1 is running. For update steps, see [TC-SL1] Sidus Audio App, Show Extras on Clap & Firmware Update.