
This reference covers the BP-TRX interface: the screen icons, the buttons, and every menu setting from pairing and audio adjustments to recording, output, and system options. To open the menu, short press the MENU/SEL button, then use the Up and Down buttons to move and MENU/SEL to select. Press Back to return to the previous screen.
Screen Icons
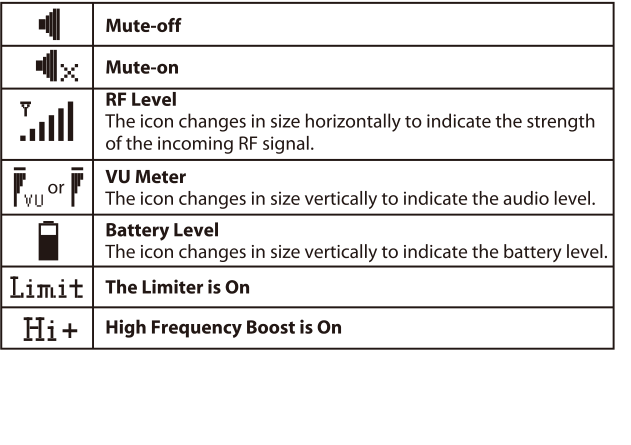
| Icon | Meaning |
|---|---|
| Mute-off | Audio is not muted. |
| Mute-on | Audio is muted. |
| RF Level | Changes size horizontally to indicate the strength of the incoming RF signal. |
| VU Meter | Changes size vertically to indicate the audio level. |
| Battery Level | Changes size vertically to indicate the battery level. |
| Limit | The limiter is on. |
| Hi+ | High frequency boost is on. |
Buttons and Navigation
- On/Off/Back Button: long press to turn the BP-TRX on or off. It also acts as a "back" button in menus, returning to the previous screen or item.
- MENU/SEL Button: enters the menu and selects highlighted items.
- Up / Down Buttons: select options and adjust values in the setup screens. They are also context sensitive:
- When the screen is locked, short press the Up button 3 times to unlock the screen.
- From the main screen, long press the Down button to enter the timecode settings page directly.
- While recording, the Up and Down buttons increase or decrease the microphone gain.
- While playing back audio, the Up and Down buttons increase or decrease the volume.
- During playback, long press the Up or Down button to switch to the last or next audio file.
Auto-lock Setting
Enter the AUTO-LOCK option in the SYSTEM SET menu to set the lock screen time (system default 15s). Options are Never, Manual, 5s, 10s, 15s, 20s, 1min, 2min, 5min, and 10min. When the screen is locked, the buttons will not work, which helps prevent settings from changing during operation. To unlock the screen, press the Up button 3 times. Under the Manual option, press Up 3 times to unlock the screen, and press Up 3 times again to lock it.
Pairing and Devices
Pair Setting
The BP-TRX uses Easy-pair technology. After setting the working mode, enter the PAIR option in the transmitter and receiver menus respectively and select YES to pair. The transmitter and receiver automatically finish pairing within about 15 seconds. The Pair LEDs flash green to indicate pairing. When the green LEDs stay on, pairing was successful. If the green LEDs flash slowly, pairing was unsuccessful, and a pop-up window indicates the result.
User ID Setting
Enter the USER ID option in the menu to set the BP-TRX's User ID and identify different BP-TRX units.
TX Remote Setting
After the transmitter and receiver are successfully paired, enter the TX REMOTE menu to remotely control every audio adjustment on the transmitter through the receiver.
TX Sleep Setting
After the transmitter and receiver are successfully paired, use TX SLEEP to set whether the transmitter sleeps. When sleep is turned on, the transmitter enters a low power mode: it locks the screen and powers down the audio input circuitry, but keeps feeding a low power data stream to maintain the link.
Audio Settings
Input Type Setting
The BP-TRX has two input modes: STEREO and MONO. Select the input type according to the audio source. Use STEREO mode if you are feeding a stereo signal into the BP-TRX.
Input Gain Setting
Enter the INPUT GAIN option to increase or decrease the audio gain as needed, matching the transmitter gain to the audio's output level, the user's voice level, and the position of the microphone. The adjustment range is -12dB to +36dB in 3dB steps.
Low Cut Setting
Enter the LOW CUT option and select the desired low-cut point. Choices range from 20Hz to 200Hz in 10Hz steps, or entirely off. Use Low Cut only when necessary, otherwise wind noise or rumble might affect your recording. Low Cut is meant to reduce light wind noise.
Limiter Setting
Enter the LIMITER option to turn the limiter on or off as needed.
Freq Boost Setting
Enter the FREQ BOOST option to add high frequency boost (a boost of audio frequencies from 7kHz to 20kHz) as needed. The boost range is 1dB to 10dB in 1dB steps.
Headphone Volume Setting
Enter the HEADPHONE option to adjust the monitor volume as needed. The adjustment range is -24dB to +24dB in 1dB steps.
Mute Setting
Enter the MUTE option to turn the mute function on or off as needed. When MUTE-ON is set in the HOTKEY menu of SYSTEM SET, you can also quickly mute the audio by short pressing the On/Off/Mute button at the main screen. When muted, the mute LED flashes red slowly.
RF Setting
RF Power Setting
Enter the RF POWER option to select the RF output. There are five options: 10mW, 25mW, 50mW, 100mW, and Auto. Set the RF power according to your recording conditions to optimize the transmitter for maximum battery life or maximum operating range.
Receiver Output Settings
Out Level Setting
Enter the OUT LEVEL option in the Receiver menu to adjust the output gain as needed. The adjustment range is -45dB to +24dB in 1dB steps.
Out Type Setting
When the BP-TRX working mode is set to RX Mode, there are four output type options: XLR, DSLR, STEREO, and SYNC. When the working mode is set to Camera Hop, there are two output type options: MONO and SYNC. Set the output type according to your needs.
Latency Setting
Enter the LATENCY option in the Receiver menu to select the latency setting: LOW, MID, or HIGH. Optimize the transmission distance between the transmitter and receiver according to your recording needs.
Recording and Playback
Record/Stop Button
After inserting the Micro SD card, short press the REC/STOP button to start or stop recording audio files in TX+REC or Rec Only mode. For card requirements, see [BP-TRX] Hardware, Antenna, Microphone & Setup.
Pause/Play Button
Short press the PAUSE/PLAY button to play or pause the audio file recorded on the microSD card.
File Management
Enter the FILE option in the menu. The BP-TRX lets you play back files, rename them, and delete takes.
System Settings
Language Setting
Enter the LANGUAGE option in the SYSTEM SET menu to select the language (system default English).
Date/Time Setting
Enter the DATE/TIME option in the SYSTEM SET menu to set the specific date and time of recording.
System Reset
Enter the SYS RESET option in the menu to reset the system and restore the default settings.
Firmware Update
You can update firmware via a USB drive (exFAT or FAT32). Download the firmware from the official website, then copy it to the root directory of the drive. Use the included USB-C to USB-A Firmware Update Adapter to connect the drive to the USB Type-C input, then select UPDATE from the menu and update the firmware by following the on-screen instructions. After the update is complete, the firmware version shown on screen reflects the latest version. The BP-TRX also supports firmware update via the built-in MicroSD card. Official website: https://www.deitymic.com.