
This guide covers the parts of your BP-TRX and the physical setup: installing the external antenna, connecting the lavalier microphone, attaching the belt clip, inserting a memory card, and charging the battery.
Nomenclature
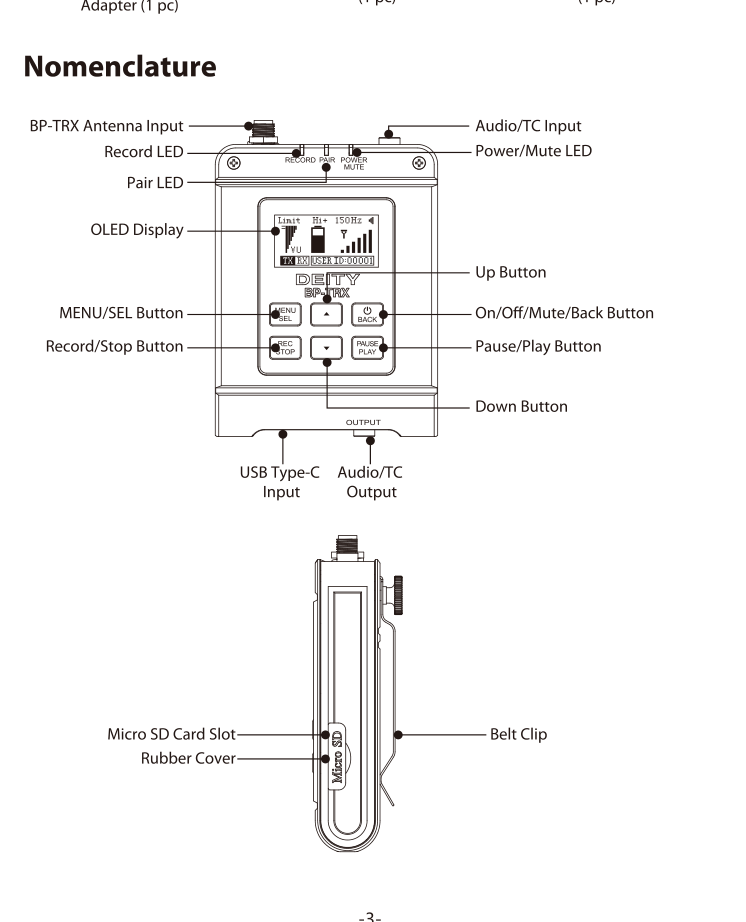
Top edge
- BP-TRX Antenna Input - SMA connector for the external antenna.
- Audio/TC Input - locking 3.5mm TRS input for the lavalier microphone or a timecode source.
Front panel
- Record LED - indicates recording status.
- Pair LED - indicates pairing status.
- Power/Mute LED - indicates power and mute status, and battery charge level while charging.
- OLED Display - 1.3 inch screen showing levels, RF, mode, and menus.
- MENU/SEL Button - enters the menu and selects the highlighted item.
- Up Button and Down Button - navigate options and adjust values.
- On/Off/Mute/Back Button - powers the unit on and off, mutes audio, and steps back through menus.
- Record/Stop Button - starts and stops recording.
- Pause/Play Button - pauses and plays back recorded audio.
Bottom edge
- USB Type-C Input - charging, data, firmware updates, and USB digital audio output.
- Audio/TC Output - locking 3.5mm TRS output for audio or timecode.
Side and rear
- Micro SD Card Slot - under the rubber cover, holds the recording card.
- Rubber Cover - protects the card slot.
- Belt Clip - attaches the unit to a belt or clothing.
1. Antenna Installation
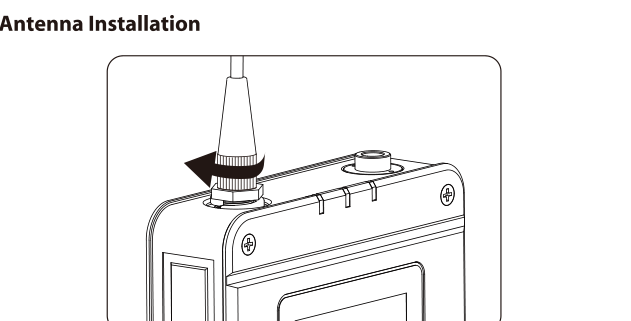
Screw the included external antenna onto the BP-TRX Antenna Input at the top of the unit.
When installed, the antenna points away from the body (belt clip side), which helps improve the transmission range.
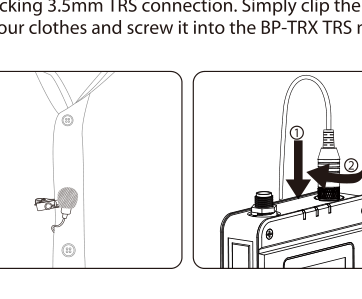
2. Lavalier Microphone Installation
The BP-TRX has a locking 3.5mm TRS connection. Clip the lavalier microphone onto your clothes, then insert its plug into the BP-TRX TRS microphone input and screw down the locking ring to secure it.
3. Belt Clip
The BP-TRX can be attached to the user's belt or clothing via the included belt clip on the rear of the unit.
Memory Card
Recording requires a Micro SD card, inserted into the card slot under the rubber cover. The card requirements are:
- Maximum card size: 128GB
- Card type: microSD
- Card format: FAT32 or exFAT
- Maximum file size: 2GB (the BP-TRX automatically keeps recording and creates a new file at that limit)
- File type: 24bit / 48kHz uncompressed PCM WAV
After inserting the card, you can record and play back files. See [BP-TRX] Menu & Functions Reference for recording, playback, and file management.
Charging the Battery
The BP-TRX has a built-in 2800mAh Lithium-Ion battery. Charge it with the included Type-C cable connected to a DC charging adapter (adapter not included). The BP-TRX supports Qualcomm QC 2.0/3.0 and MTK PE quick charge.
The Power LED reports battery and charging status:
- The LED glows green when the battery is good.
- The color changes to red when there are about 30 minutes of operation left.
- While charging, the Power LED flashes between red and green.
- When fully charged, the Power LED stays green.
Powering On and Off
Long press the On/Off/Back button to turn the BP-TRX on or off. The same button also acts as a "back" button while navigating menus, returning you to the previous screen or menu item.