
The BP-TRX has an internal crystal-based timecode generator, so it can jam to an external source, generate its own timecode, and pass timecode on to other devices. This guide explains the timecode overview screen, the timecode modes, frame rates, jamming, restarting, and the timecode output level.
Timecode Overview
Timecode is time information written to data when recording video and audio. It is used for video editing, control of other devices, and synchronization of audio and video. When both audio and video record matching timecode, aligning them on a timeline and keeping them in sync is easy when using nonlinear editing software.
Timecode is available in the following TRX modes: TX+REC, RX Mode, Master TX, Camera Hop, TC Box, and Rec Only.
- The BP-TRX uses a precision oscillator that generates timecode with a high degree of accuracy (+/- 0.5 ppm, or approximately 1 frame per 24 hours).
- Even after powering down, the BP-TRX will continue its internal timecode for 6 hours.
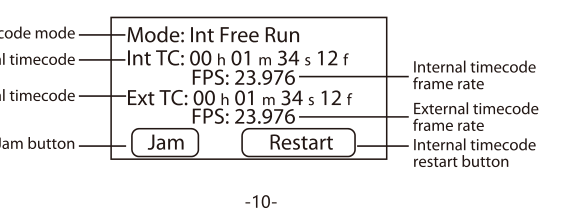
The timecode screen shows the current timecode mode, the internal timecode (Int TC) and its frame rate, the external timecode (Ext TC) and its frame rate, and the Jam and Restart buttons.
Timecode Mode Setting
The timecode mode determines whether the BP-TRX generates timecode, and when. Internal timecode can be generated only while recording, or regardless of the recording mode.
Short press the MENU/SEL button, select TC SYNC, and press MENU/SEL to enter the timecode setting interface. Select the mode, then press MENU/SEL to apply the mode you require.
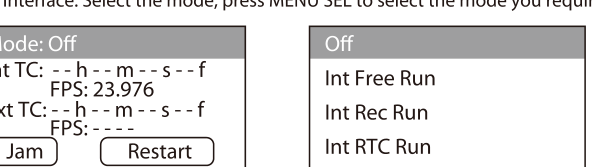
| Mode | Explanation |
|---|---|
| Off | No timecode is written to the recording file. Timecode is not output from the audio output jack. |
| Int Free Run | Internal timecode is generated regardless of the recording mode. It can be set manually using MENU/SEL > TC SYNC > TC SETTING > Jam, or MENU/SEL > TC SYNC > TC SETTING > Restart. Timecode is always output from the audio input/output jack. |
| Int Rec Run | Internal timecode is generated only when recording. It can be set manually using the Jam and Restart menu items above. When switching from another mode, or when recording stops, the internal timecode stops at the last value. |
| Int RTC Run | Internal timecode is generated regardless of the recording mode. It is synchronized (jammed) with the RTC (internal clock) in these situations: at startup, when Date/Time (RTC) has changed (see the Date/Time setting), and when switching to this timecode mode. Timecode is always output from the audio input/output jack. |
Frame Rate Setting
You can set the frame rate for the internal timecode to 23.976, 24, 25, 29.97, 29.97DF, 30, or 30DF. DF stands for Drop frame.
Short press MENU/SEL, select TC SYNC, and press MENU/SEL to enter the timecode setting interface. Select FPS, then press MENU/SEL to choose the frame rate you require. Matching frame rates must be set in advance on all connected video and audio devices.
Timecode Jamming
Jamming from an external timecode source
Use the included Time Code Sync & Audio Cable to jam the BP-TRX to an external timecode source. Short press MENU/SEL, select TC SYNC, and press MENU/SEL to enter the timecode setting interface. When an external timecode input is detected, select Jam to sync the internal and external timecode.
Jamming the internal timecode to other devices
The audio output can be engaged to give a timecode source, to connect or jam other devices such as recorders, cameras, other BP-TRX units, or third party timecode devices. Use the included Time Code Sync & Audio Cable or a TRS cable to connect the BP-TRX audio output jack to the external timecode input jack, then perform the synchronization as follows.
If the TRX Mode is set to RX Mode or Camera Hop Mode: select the OUT TYPE as SYNC, press the Up or Down button to select TC SYNC, then press MENU/SEL to select Jam to synchronize the timecode.
The output signal assignment for each Out Type is:
| Out Type | Signal (Tip / Ring / Sleeve) |
|---|---|
| XLR | A+ / (unused) / G |
| DSLR | A+ / A+ / G |
| HOP | AL / AR / G |
| SYNC | TC / A+ / G |
If the TRX Mode is set to TX+REC, Master TX, TC Box, or Rec Only: press MENU/SEL, select TC SYNC, press the Down button to select OUTPUT as ON, then select Jam to synchronize the timecode. In other modes, skip this step.
Note: If the TRX Mode is set to IEM Mode, there is no timecode output.
Restarting the Internal Timecode with a Specified Value
Press MENU/SEL to select Restart and press MENU/SEL. Set the restart value: move the cursor or change a value with the Up and Down buttons, and select a parameter to change by pressing MENU/SEL.
Note: If the timecode mode is set to Int RTC Run, you cannot restart the internal timecode.
Timecode Level Setting
To accommodate a certain TC level needed by a particular connected device, and if the external timecode is not detected during timecode synchronization, the BP-TRX can increase or decrease the voltage level of the timecode output to make it detectable. The adjustment range is 0.5V to 3.0V in 0.1V steps. The system defaults to 2.5V.